
Hello guys, welcome to my new WordPress blog. After a lot of initial hiccups, it is a bit stabilised now. I am yet to work on the Graphics for the blog, however, I will continue to post new ideas and content as I miss writing and interacting with all of you. New beginnings warrant a new tutorial; don’t you think so? So to begin things at the new blog here is a resin jewelry tutorial – DIY Faux opal earrings inspired by the snowfall and festivities of December.
My first tryst with Opal stones was in the early 90’s when my Father’s mentor, an Elderly English gentleman presented them to my mom. Over the years, and multiple house moves, we lost the good ones and a couple of them ended up with me. But without understanding their value (slightly put off my their dull milky appearance) I used them in an experiment. It is ones of the blunders I regret to this date, particularly when I see Beautiful fire opal rings made by Yael Designs. So I set out to create Faux opals using resin. I failed many times but eventually made the components shown in this tutorial. Though they do not resemble opals, I feel that they are reminiscent of snow falling on streets lit up during Christmas.

Living in a hot country, I have never touched snow (only seen it in my travels aboard). However, I have always pictured in my head snowy streets decorated with festive fairy lights. To bring together the combination of warmth (of the lights/fire) and Cold Snow I have created these DIY Faux opal earrings
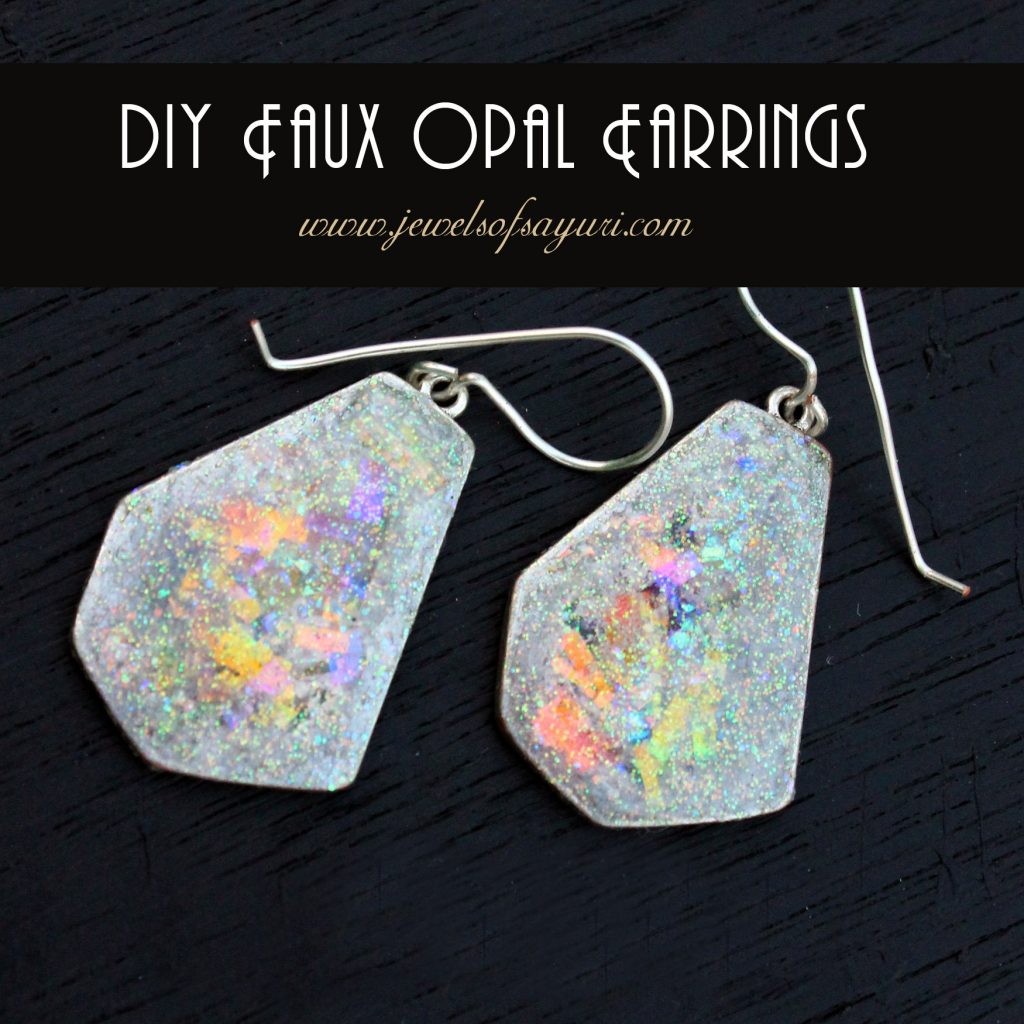
DIY Faux opal earrings
Materials
1. Silver tone open hexagon bezels
2. Ice resin kit (cups, mixing stick)
3. Dichroish film
4. Ice resin Crystal opal
5. White Patina ink
6. Fine Transparent holographic glitter – optional
7. Silver ear hooks
8.Craft mat, packing tape, nose pliers and wet wipes
Method
1. Adhere 3″ of transparent packing tape (do not cut it from the roll) to your craft mat. Fold the tape back so that the sticky side faces you. Leave about an inch and cut it off; fold it back and stick it to the mat. Now you have a sticky surface to place you open bezels

2. Place your bezels on the tape and press firmly so they adhere well. Avoid any gap along the edges
3. Shred (cut) 2mm strips of dichro-ish film of your choice ( I used orange, purple, green, and yellow) and press them into the open bezel so that they stick to the tape.
4. Mix your epoxy doming resin as per the manufacture’s instructions


That’s it for today, I’ll get back to you soon detailing my Blogger- WordPress adventure
I hope you found it interesting
Cheers

11 responses to “DIY Faux opal earrings”
Lovely! I love the inspiring image of snowy streets decorated with festive lights that transfers perfectly in your earrings! Fab project just in time to make for beloved ones for the upcoming holidays!
Thanks Maya, for the first comment on the new blog 🙂 I am glad that you enjoyed it
Hey lovely one, great job:)
But little windows ship to India?
I don’t think so. I got it shipped to my cousin’s place in the US and had her bring it
The color and sparkle you have achieved is magical! This is such a comprehensive tutorial. My second trial with resin was better than the first but still not successful enough to take this path 🙂
That’s great to hear. The success of resin depends on one the quality of resin and second the method that we follow. Warming the resin before use, mixing for 2 minutes, resting for 5 and being patient as it is drying can lead to much better results
Those are brilliant earrings Divya!!!
Thanks Priya, I had fun using those bezel frames
They look like the real thing Divya. Wow, amazing. It’s just how I imagine snow would sparkle and I’d also love to see snow for real. It’s not something that happens here in South Africa often.
I am glad that you see it too
Thanks for sharing this with us,Your blog is very interesting and Informative, and helps me to Know more about the latest designs and makes my mind to have these kinds of jewellery. and I would try to come here time and again for more updates. I will keep visiting you blog.