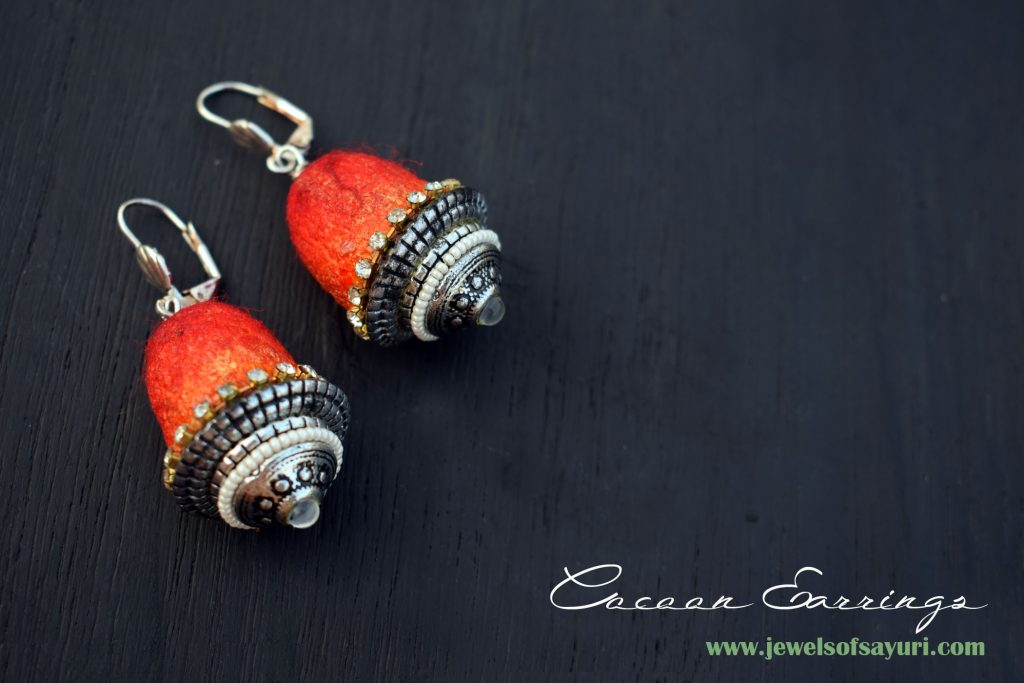
In my post on Cocoon Jewelry, I had shown cocoon earrings in bright orange, red and crimson, that charmed everyone who saw it. Not only did I get praise over comments and messages, I also received a lot of compliments when I wore them at work. Light weight and comfortable, these Silk Cocoon earrings are surprisingly sturdy and a delight to wear. If you want to know how to make a pair for yourself, look no further. Here is the tutorial for making your own Silk Cocoon earrings. Please note that this tutorial may be used to create cocoon products for personal consumption only and not for commercial purposes.

DIY Silk Cocoon earrings tutorial
Materials
- Silk cocoon – 2 (undyed in natural white or offwhite)
- Marabu Silk ink or silk paint in crimson
- Translucent ink (Photo color) in red
- Translucent ink (Photo color) in scarlet – optional
- Fabric paint – gold
- Acrylic liquid varnish – clear
- Paint brushes and cotton fabric
- Silver tone 2″ eyepins – 2
- Conical bead cap – 0.5″ diameter (any finish)
- Acrylic shank buttons – 2
- Rhinestone chain
- Liquid fusion glue
- Silver tone ear hooks
- Tools – Round nose pliers and Scissors
Method
Apart from the materials listed you need two other very important ingredients – Time and Patience. It takes atleast three days to make a pair of earrings!!
Dyeing
There are several dyeing techniques that you can use to dye cocoon. For this project I used the technique of spot application of colour, just like we do while painting a surface.
- Apply the silk dye to the conical end of the cocoon and wait for it to spread and dry for 15 minutes. It will still be wet at this stage and easy to blend other colours.
- Dab the inks (for shading as you wish) until the entire surface is covered. You will need to repeat the dabbing and blending process atleast 3-4 times to get good coverage. The layers need to dry for 10 minutes each between each color change. I found it easier to paint them by wearing them on my fingers as caps.
- When you are satisfied with the coverage (and the paint is still wet) dab or blend in gold or any other metallic paint of your choice. Let the cocoons dry overnight.
- The above steps only cover the outside, If you want to cover the inside as well repeat the steps the next day.
- You can either paint the cocoon and cut it or cut it to size before colouring it. The second approach is faster as you only have to colour it once
Sealing
Some cocoons are overly fibrous while others are not. Also, some inks bleed while other don’t. In order to account for these differences, you need to seal the colours on the cocoon. This can easily be done by applying 2-3 coats of varnish on the dyed cocoon. Let it dry for a few hours till the cocoon looks smoother than it once was. The cocoons that I used are from The Craft shop.

Make the earrings
-
- Add a bead cap to an eyepin. This is to make sure that the cocoon’s shape does not get distorted over time.
- Poke a hole on the top of the cocoon, thread the eyepin with a little glue on it and create a wrapped loop. Cut excess wire.
- Using liquid fusion glue, adhere the cocoon to the button. After an hour, glue the rhinestone chain to embellish.
- Add a ear hook and repeat for the other earring of the pair.


14 responses to “DIY Silk Cocoon earrings tutorial”
Thank you for the thorough tutorial, firsthand tips are so appreciated not just on coloring but also about keeping cocoon’s shape! Do you thinks it’s possible to cut a cocoon and make a bell flower, for instance? Hm, this tutorial gave me an idea how to use over-sized bead caps.
I actually saw a bell shaped flower earring on Etsy made out of cocoons. So it might be possible. However, I doubtful reg its durability. It might become shapeless without a stiffening agent, after a while. Do try it out if you have a chance
These are very pretty. Beautiful! Thanks for sharing at Merry Monday. Hope to see you next week.
Thanks Jenny. do try them out
I may never try but nice to know about these! best wishes
thanks for visiting and commenting
Such a beautiful creation! Very nice idea.
Thank you Ranjana
Thank you so much for the tutorial! The earrings are amazing!
Thank you Deborah, do try it out
Your earrings are amazing and the tutorial is excellent! I have never worked with cocoons but these look so tempting 🙂
Thanks Maya. Apart from jewelry you can also make floral arrangements with cocoons. They work well as photo props too
Thank you Divya for sharing this excellent tutorial on your FAB earrings. I hope one day to experiment with silk cocoons.
Do try is out Alysen. You might be able to find cocoons at a silk farm, textile fairs or even hobby shops